
What Are the Parts of a Microscope and How Should They Be Properly Used?
source: Biology LibreTexts
Microscopes are essential tools in biomedical research, allowing precise visualization of microorganisms, cellular structures, and tissue morphology. Understanding each part of a microscope and mastering its correct usage is critical for producing accurate and reproducible observations.
Key Microscope Parts and Their Functions
Let’s break it down. The terms might sound technical, but you’ll see that each part has a simple role.
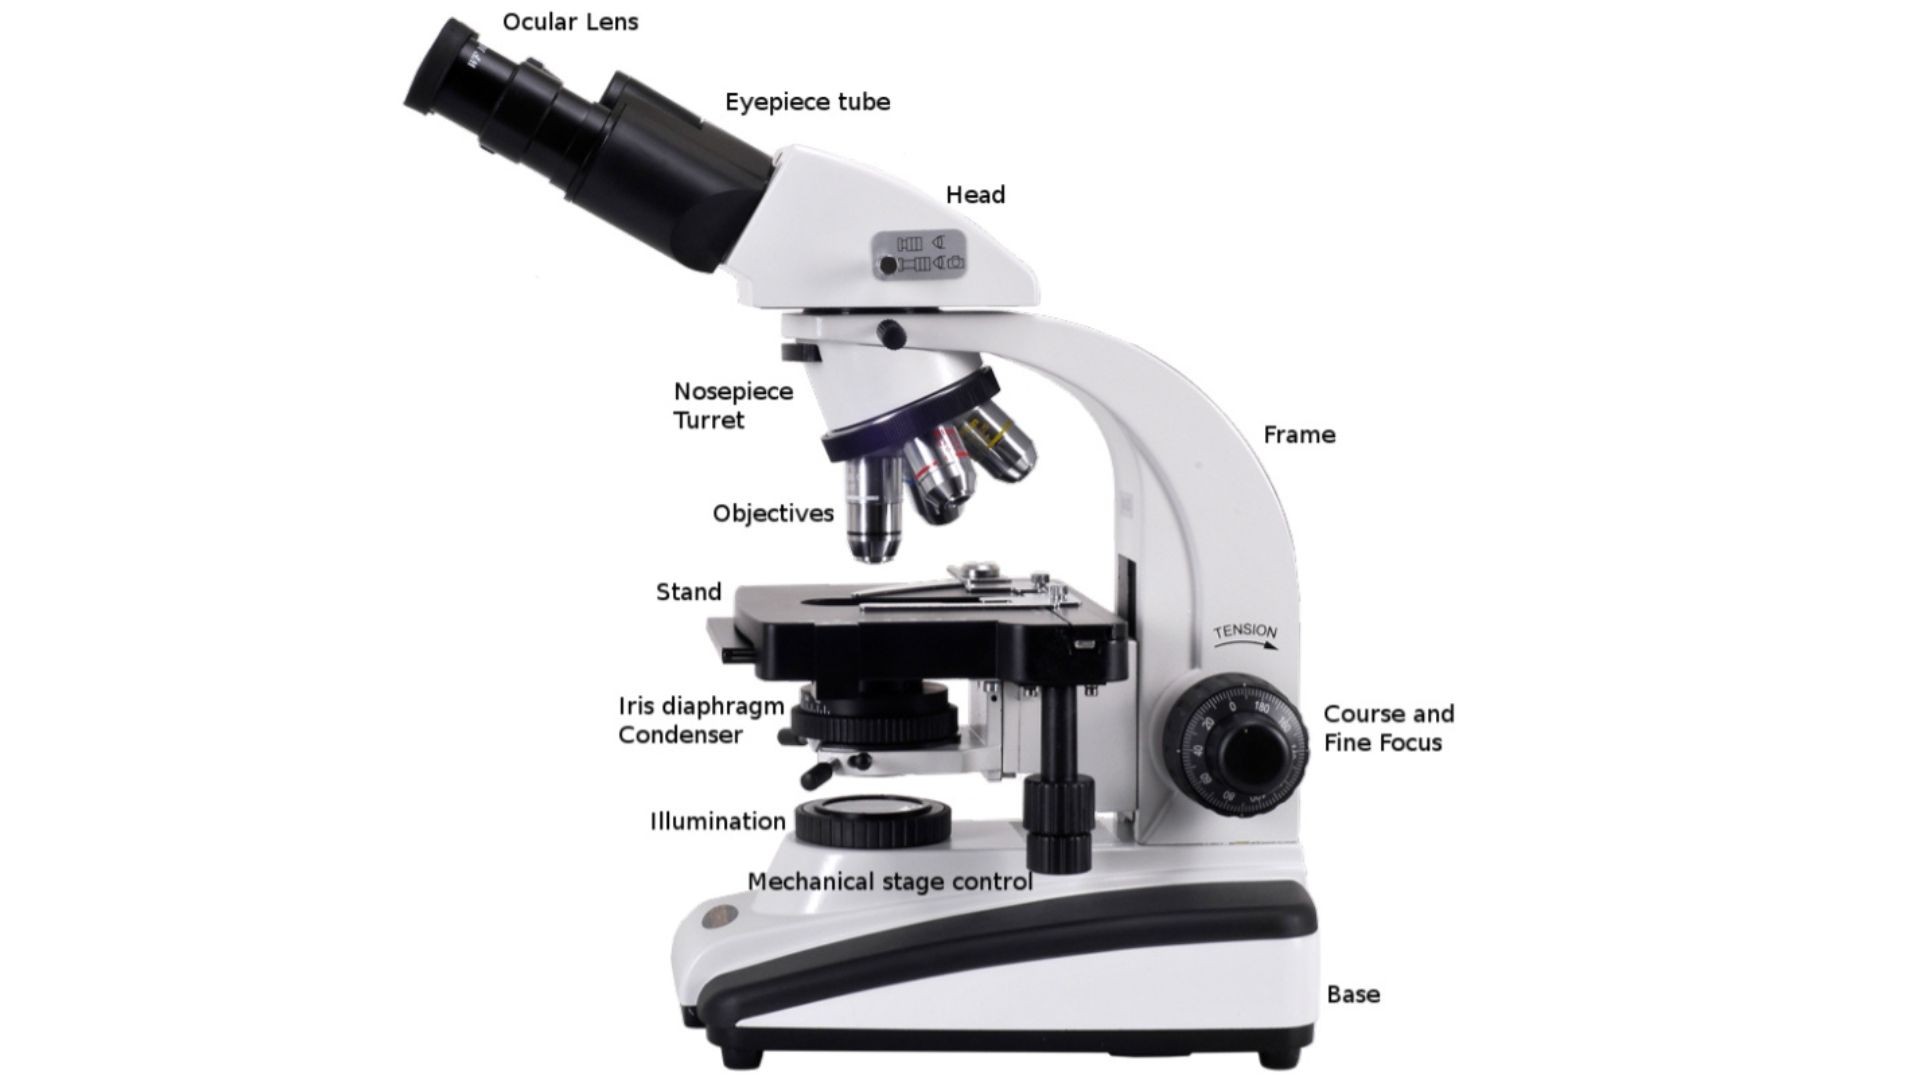
Ocular Lens
- Function: Where you look through; magnifies the image usually by 10X.
- Think of it as your “viewfinder” into the microscopic world. Without it, you’d just see a blur.
Objective Lenses
- Function: Main magnification tool; typically 4X, 10X, 40X, and 100X (oil immersion).
- These lenses are mounted on a rotating nosepiece. Switching them changes your level of detail. Imagine zooming your camera from a landscape to a close-up—you’ll see details you never noticed.
Nosepiece Turret
- Function: Holds and rotates objective lenses into place.
- Quick, easy lens switching without moving the slide around.
Stage
- Function: Platform where the slide rests.
- Some stages have mechanical controls for precise slide movement—handy when trying to follow a moving organism.
Stage Clips or Mechanical Stage
- Function: Holds slides firmly.
- Prevents slides from sliding off while you’re adjusting focus or moving objectives.
Condenser
- Function: Focuses light onto the specimen.
- Paired with the iris diaphragm, it controls how much light illuminates your sample. Too much light? It washes out details. Too little? Everything’s shadowed.
Iris Diaphragm
- Function: Adjusts light intensity.
- Think of it like squinting your eyes on a sunny day—it reduces glare and enhances contrast.
Coarse and Fine Focus
- Coarse Focus: Large adjustments, used for low power.
- Fine Focus: Tiny tweaks, essential for high magnification clarity.
- The difference between blurry frustration and crisp observation lies here.
Arm
- Function: Supports the microscope; a handle for carrying.
- You know what? A lot of students underestimate its importance. Improper handling can misalign lenses or damage optics.
Base
- Function: Stability; holds the microscope steady.
- A heavy base reduces vibration—critical when you’re looking at tiny, moving cells.
Light Source
- Function: Illuminates the slide.
- Some microscopes use mirrors to reflect ambient light, while modern ones have built-in bulbs or LEDs. Light is literally the lens to seeing your world.
Diaphragm Lever (if separate)
- Function: Works with the condenser to adjust light volume.
- Subtle adjustments can make a massive difference, especially with transparent specimens.
Arm and Coaxial Focus Combination
- Often, the coarse and fine knobs are combined coaxially on the arm, simplifying adjustments without moving your hand too far.
Stage Controls
- On mechanical stages, these knobs move the slide precisely in X and Y directions. Essential when scanning a large specimen systematically.
Notice how each part isn’t just a static object—they’re interactive, responsive, and tuned to work in concert. Learning them is like learning the instruments of an orchestra; when one is off, the music suffers.
How Do You Properly Use a Microscope?
Knowing the parts is just the first step. Mastering the usage is what separates casual observers from proficient lab researchers. Here’s a step-by-step guide.
Step 1: Preparing Your Microscope
- Carry it carefully with two hands. One hand on the arm, one under the base.
- Make sure the light source is on or the mirror is correctly positioned.
- Raise the condenser and open the iris diaphragm fully for maximum light during initial focusing.
Step 2: Slide Placement
- Place your slide on the stage.
- Secure with stage clips or ensure the mechanical stage is locked.
- Align your specimen in the center of the light path.
Step 3: Focusing Sequence
- Start with 4X objective, stage lowered.
- Use coarse focus knob to roughly bring your specimen into view.
- Switch to 10X objective, use fine focus knob for clarity.
- Move to 40X objective, fine-tune with fine focus knob.
- For 100X oil immersion, place one drop of oil on the slide.
- Make sure 40X never touches the oil.
- Switch to 100X and focus slowly with fine knob only.
- Never return to 40X after applying oil—risking contamination or lens damage.
Step 4: Adjusting Light and Contrast
- Use iris diaphragm to modify brightness.
- Adjust condenser height slightly if necessary.
- Proper illumination ensures your image is sharp and structures are visible.
Step 5: Cleaning the Microscope
- Lower the stage and remove the slide.
- Turn off the power.
- Wipe oil off the 100X objective and any affected surfaces using lens paper.
- Clean surfaces with alcohol-moistened lens paper.
- Wipe surfaces with a new dry piece of lens paper.
- Return to the 4X objective.
Note: Never use tissues, Kimwipes, or paper towels—they can scratch the lenses.
Common Mistakes and Safety Tips
- Skipping low magnification: Always locate your specimen at low power first.
- Improper oil use: Only for 100X. Using oil with 40X risks lens damage.
- Incorrect light settings: Poor contrast or washed-out images.
- Neglecting cleaning: Oil or dust left on lenses will affect clarity in future experiments.
Proper handling protects both your samples and your microscope—tiny habits make a big difference.
FAQs
What are the parts of a microscope and their functions?
The 14 key parts include ocular lens, objective lenses, nosepiece, stage, stage clips, condenser, iris diaphragm, coarse and fine focus knobs, arm, base, light source, diaphragm lever, and stage controls. Each plays a role in magnifying and stabilizing the specimen.
What is the difference between coarse and fine focus knobs?
Coarse focus adjusts large distances to bring a slide roughly into view. Fine focus makes small, precise adjustments, crucial for high magnification clarity.
Why is cleaning microscope lenses important?
Dust, oil, or residue distorts images and can scratch lenses. Always clean with lens paper and alcohol, never tissue or paper towels.
How do labeled worksheets help in learning microscope parts?
Worksheets, diagrams, and quizzes reinforce spatial memory, helping students quickly locate and identify components during practical lab sessions.
Recommended Reading
Disclaimer:
This AI-assisted content is intended for academic reference and informational purposes only and does not constitute medical advice, diagnosis, or treatment. Always consult qualified healthcare professionals regarding any medical condition or treatment decisions. All risks arising from reliance on this content are borne by the user, and the publisher assumes no responsibility for any decisions or actions taken.

Have a question about biomedical research or published clinical studies? PubMed.ai helps you explore published biomedical literature with AI assistance.
Subscribe to our free Newsletter